Sunday, 19 March 2017
Proggy Seat Cushion
I grew up with rag rugging as a necessary skill for making a comfortable home. My Nan Emily regularly made rugs and mats with recycled fabrics - for most part they were functional rather than pretty and every scrap of available fabric was used - including old tights! I've dabbled with rug making on and off over the years and decided this spring to christen a new set of rag rugging tools and make up something useful and not too labour intensive - a progged seat cushion for my studio. First off, I marked my cushion pad size (plus an extra few centimetres) and a simple design onto a piece of hessian.
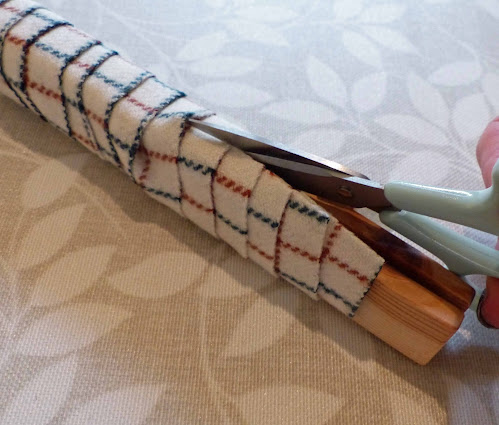
Then I found myself some suitable fabrics - I was lucky position to have purchased some sizeable lengths of Somerset Fox's flannel at amazing prices. This fabulous fabric cuts like butter and often with very little fray, which is perfect for rag rugging. I started off by cutting 1" strips and wound one around my nifty wood gauge. It has a groove in one side just large enough for the underside of a pair of sharp scissors to be run down to cut through the fabric layers wound around.
This inexpensive cutting gauge is just perfect for quickly producing equal length strips and you can find for sale with other tools on the website of rag rugger Jenni Stewart-Anderson You can use all kinds of fabrics including old t-shirts and blankets. I recommend fabrics that don't fray too much and where you like both the front and the reverse.
Then to start progging in a central position. You will find lots of advice about how to pull the cut fabric pieces through the hessian, however, personally I recommend a 'bodger' tool as being the easiest tool to use. It's very straight forward to push the point of the bodger through strands of hessian and then 'grab' a short end of a fabric piece into the blunt end to pull through the hessian strands. The fabric I was working in was a light weight flannel so I missed a few strands of hessian between the pieces on my first line of progging.
The initial line of progged pieces lie flat, so I worked a square of pieces close enough together so that the central pieces were standing nice and upright.
Regularly looking at the reverse of the work was important to check for consistency and that the progged pieces were far enough apart to not pull in the hessian - a common problem for new rag ruggers.
Then it was lots more of the same - I found regularly changing the fabric colour added interest. Also, although I had drawn a design, I did deviate from it at times to make the best of the fabric I had available. It can be quite tricky to calculate how much fabric you need for progging - often more than you think and you may need to add in some extra fabrics to fill the whole design.
A progged design is not very defined on the right side, although much clearer on the reverse as can be seen as I was reaching the end of my piece.
To make a neat edge to the cushion pad, I turned in the hessian for my final round and progged through 2 layers of hessian. This was a bit harder going, however, I made it a little easier by spacing out a little further apart. The excess hessian can then be trimmed back and a backing piece put on the progged work.
I was very pleased with my final progged piece and that I stuck to my guns, using only what I had to hand in my studio. It was surprising heavy for a smallish piece and I can imagine a large rug would have been extremely heavy and certainly help to keep legs warm when making up in the winter.
If you have been meaning to get around to trying progging, then do give it a go. It's a brilliant technique for reducing fabric scraps and turning them into something useful and beautiful! My friend Ann progged this stunning cushion pad for an old oak chair and it feels as comfortable to sit on as it looks amazing.
Subscribe to:
Post Comments (Atom)


No comments:
Post a Comment