The arrival of beautiful Spring days in the UK is calling loudly for stitch projects to sit outside with. At the end of the winter and the 3rd UK lockdown, to feel the warm of sunshine is just fabulous. Plus it's time to get a little fresh air to winter weary tootsies again, and these simple crochet slippers in 100% wool are perfect for this and still avoid feet getting too chilly.
After indulging in a pair of exquisitite and expensive wool pumps last year, I decided to have a go at making my own. The success of this project is as ever down to the choice of materials and in truth I experimented with quite a few wools for the crochet before settling on for a striking Aran weight yarn by Colinette - Hullabaloo. It comes in lots of vibrant colours and makes up with a lovely tweedy effect.

I also wanted to have a wool base to my shoe for . I immediately knew the perfect product to try - a heavy duty wool felt made by Fernhill Fibre on the Mendip Hills in Somerset. Then to cut a slipper sole which is the most important aspect for this project. The trick is to find a slipper or lightweight shoe that you already have that is a perfect fit for your feet - I have a very narrow instep and long toes and getting the correct shaping was crucial. I glued two layers of wool felt together and this made for a very sturdy sole. This could be substitued with more layers and I would love to hear ideas about other materials to try.

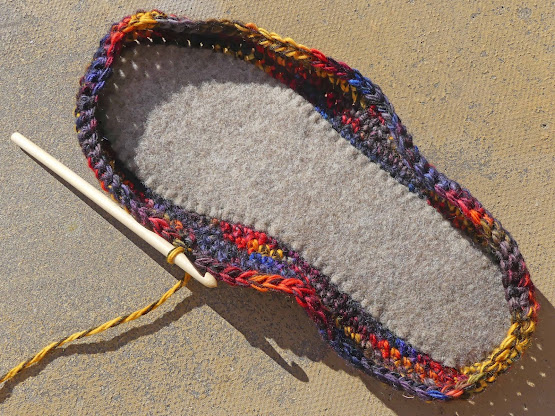
Next to secure the layers fully together and to create an edge to crochet the slipper off. I used some recycled carpet yarn to do this and blanket stitched around the edge, spacing the stitches around 0.5cm apart. I found that it's best to do this as tightly as you can, although this does make the first round of crochet a little fiddlier. Working with several shorter lengths of wool rather than one long one avoids tangles and makes for easier overall stitching.
I tried a few hook sizes with the yarn to achieve a reasonably dense stitch and went for a 5mm hook for the whole project. To start, I double crocheted all the way around into the top edge of the blanket stitch - this is called single crochet in US terms. I started in the inside instep to minimise the visibility of row changes.
The crochet stitch has a tendancy to stand up in one direction, which is important to remember when you get onto the 2nd slipper to ensure that you make a left and right slipper! After completing a full circuit, slip stitch to the first double crochet and chain 1 ready for the next round.
On the 2nd round, continue with double crochet, picking up both strands of yarn from the first round of stitches. I worked on keeping a tightish tension throughout to create a firm fabric.
I continued with rounds of double crochet until the level of crochet covered my toes - for me this was 6 rounds in total.
For the final round I changed to treble crochet (double US), starting with 2 chain before making the first treble crochet stitch. This round of taller stitches allows for a ribbon or lace to be threaded through.
The crochet rounds in are completed before you know it and at this point you can assess how well it is going to fit. If you find that it is too far down the foot, undo the last row of trebles and add in an extra row or two of doubles. It's good to remember too that our left and right feet can be different sizes - I'm sure that my right foot is larger!
The slipper is simply 'fitted' by threading a ribbon or lace through the treble crochet row and gathering up and securing on the top of your foot. The trick before you do this is to push your foot into the back of the slipper and to pull the slipper front as far forward as possible before tying th ribbon/lace - it's quite surprising how without any shaping this seems to work and feel surprisingly secure and comfortable. A few final embellishments mad with my new clever
Multipom frame and my sunshine slippers were complete. I hope that you enjoy this little sunshine project too and that it also makes you smile and feel happy.


No comments:
Post a Comment